
Fish Tank
When we talk about the fish tank for PiWars Feed The Fish challenge first phrase that come to me is ‘Cheap Chinese Holographic Displays’ as if we are living in the near future where those do exist. But unfortunately I am not aware that they are made, yet.
Original idea was to go there and find a way to ‘put’ some fish in a fish tank. I am sure that many other teams had similar ideas. Question was only how to make it look like real fish tank!
Luckily, some 13 years ago I saw brilliant youtube video made by Johnny Lee:
![]()
which I immediately replicated using his software and being completely awed by 3d stuff ‘sticking out of the monitor’. And, it didn’t take long to connect these two and try to apply it to this problem.
Components
There are quite a few components that needed to come together for the fish tank to work as hoped for:
Monitors
First thing was to source correct monitors which after the PiWars might still have some use and which would easily fit the dimensions of the fish tank tower for PiWars Feed The Fish challenge.
After some search I found this:

(there are other manufactures producing more or less the same monitor)
It was around £40 delivered and dimensions of the panel were spot on - width of 180mm (the fish tower is 200mm)! The main interface for those monitors is HDMI which fits Raspberry Pi perfectly. All I had to do was to strip the plastic housing and mount panels on something more solid than just cardboard.
Raspberry Pis
Idea was to use only two monitors as in normal course of the filming of the challenge we’ll have only one side and one corner of the fish tank exposed. What is on the ‘other’ side would be up to imagination of the viewers.
First thoughts were to use Raspberry Pi 4 with both monitors attached to it. But, there were quite a few little issues to fix with that approach:
- would desktop be spanning two monitors - and application would be needing to render two camera views side by side on the same window (which seemed like a complication)
- or would I be able to create two desktops but then two applications would need to run side by side (again issue with complexity)
- or would I be able to create two applications running on two monitors without running X windows
Because of so many extra little problems to solve I decided to go with yet another way to fix it: use two Raspberry Pis - each to drive separate monitor.
Software (I) - Raspberry Pis
So, next is software for 3D. Luckily I have been playing with LibGDX (Java 3D library) on the Raspberry Pi for a while now (Raspberry Pi Forum: LibGDX on RPi - I’ve been maintaining the port of LibGDX for Raspberry Pi for some time) and had plenty of prior art for it. One being
That code was easy to add yet another ‘game’, add objects (fish, decorations, balls…) and render them on each screen from two different angles. But, each screen would need to present exactly the same position of objects in such virtual world at any time. Again, prior art was in using my multiplayer game server (written as well in Java) to actually drive the simulation - move the fish around.
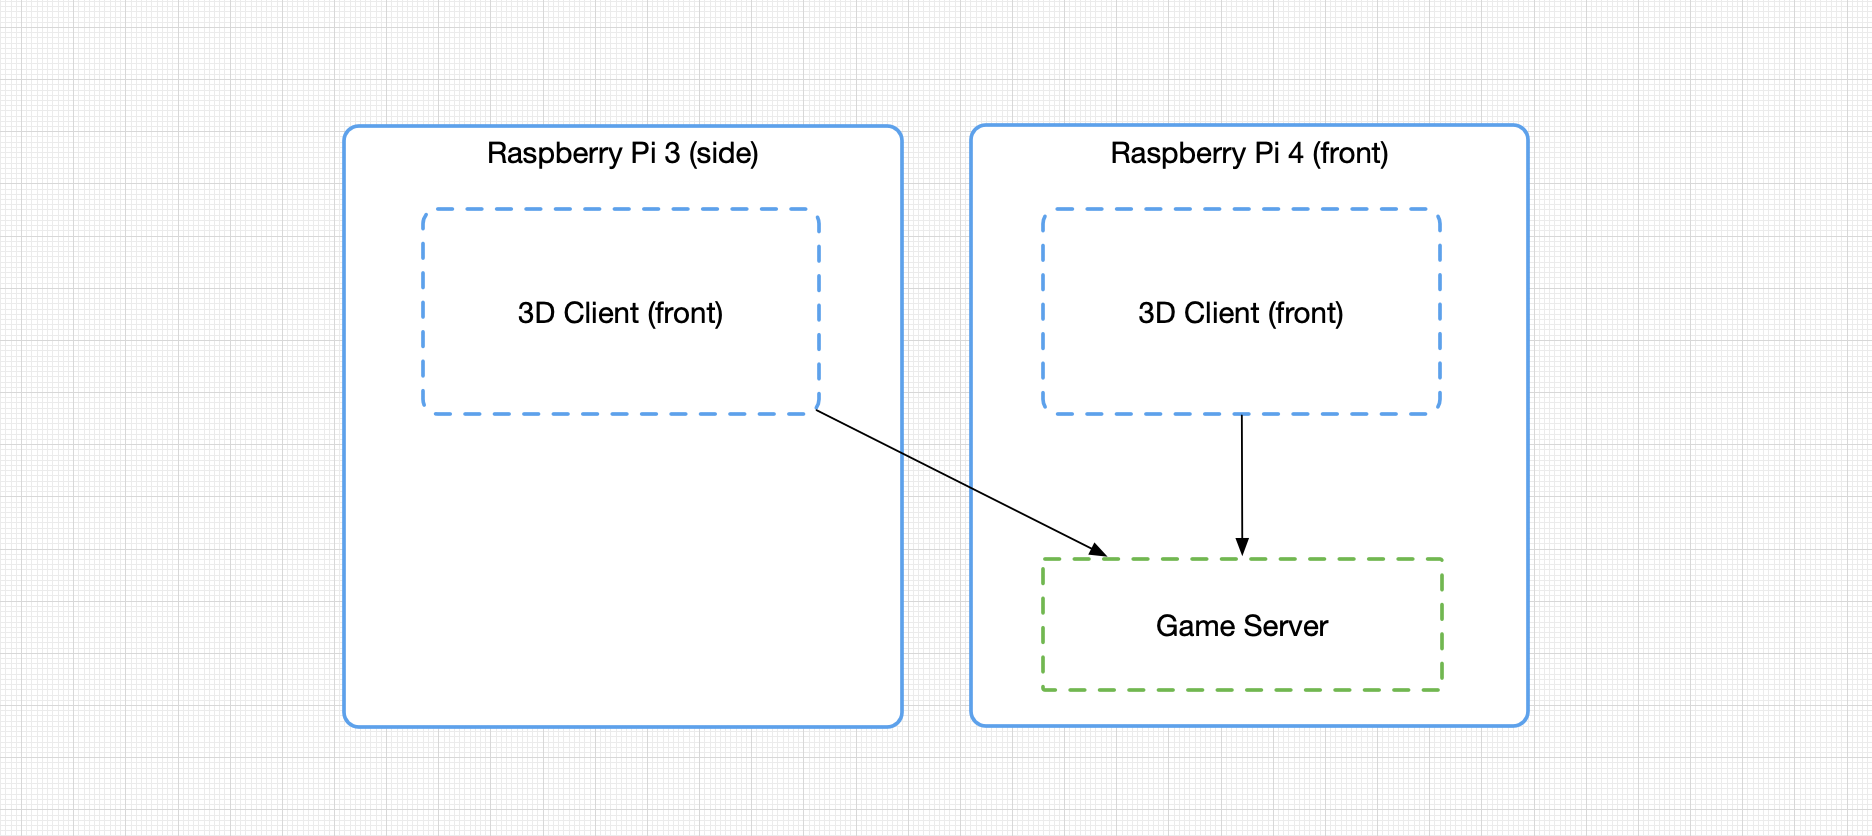
So, each Raspberry Pi is running a client, 3D app which ‘logs in’ on to the game server (that runs on Raspberry Pi 4 - as it has more memory and faster CPU). The server is the one to move fish around (and define positions of static objects). Easy, right? Well…
Software (II) - The Fish
First task was to find source of free 3D objects on the internet and only two fish object I could find that would normally be found in the fish tanks were ‘ordinary’ tetra fish and nice Atlantic spade fish. But objects by themselves were less useful as they came as rigid STLs (or such object files).
So, next task was to add ‘bones’ to the models. And not only ‘bones’ - but go through process they call ‘painting bones’ - associating different weights to vertices around the model depending on different ‘bones’ points that reside normally inside of the models. That would allow software to separately move those points and they would affect outer shell of the object itself. In our case would animate fish.
Of course - that is done in Blender, which in turn, prompted a need for a quick learning how to get object in Blender, how to create bones, how to associate vertices to the bones and how to make smooth, gradual transition of vertices association from one bone to another. Plenty of fun playing with it - I felt like one of those early CGI animators doing it.
And then those modified objects needed to be exported in such way that it can be used with little conversion utility from LibGDX that converts objects to format that is easily importable by the code. As you can see - plenty of hoops to jump through before we get to the rendering and animating fish on the screen.
Software (III) - The Communication
While prototyping all goes. And in this case all went through the local WiFi. Not the fastest as
Raspberry Pi WiFi for me is what we defined long time ago for our Game Creators Club.
Main hub - WiFi access point is still separate old an Raspberry Pi 3 with little screen in the middle…
And all would be hard coded for that network, but fish tank was needed at M.E.T headquarters and
networking there was different. Fortunately Pal suggested to set up network in the least complicated way:
direct ethernet cable between two Raspberry Pis! And luckily, all is already provided for that
in the original Raspbian (now Raspberry Pi OS) files - all I needed to do is to remove
a comment from a few lines in /etc/dhcpcd.conf file that allow setup of static IPs on eth0 interface on both Raspberry Pis and…
Well, that was it!
Head tracking
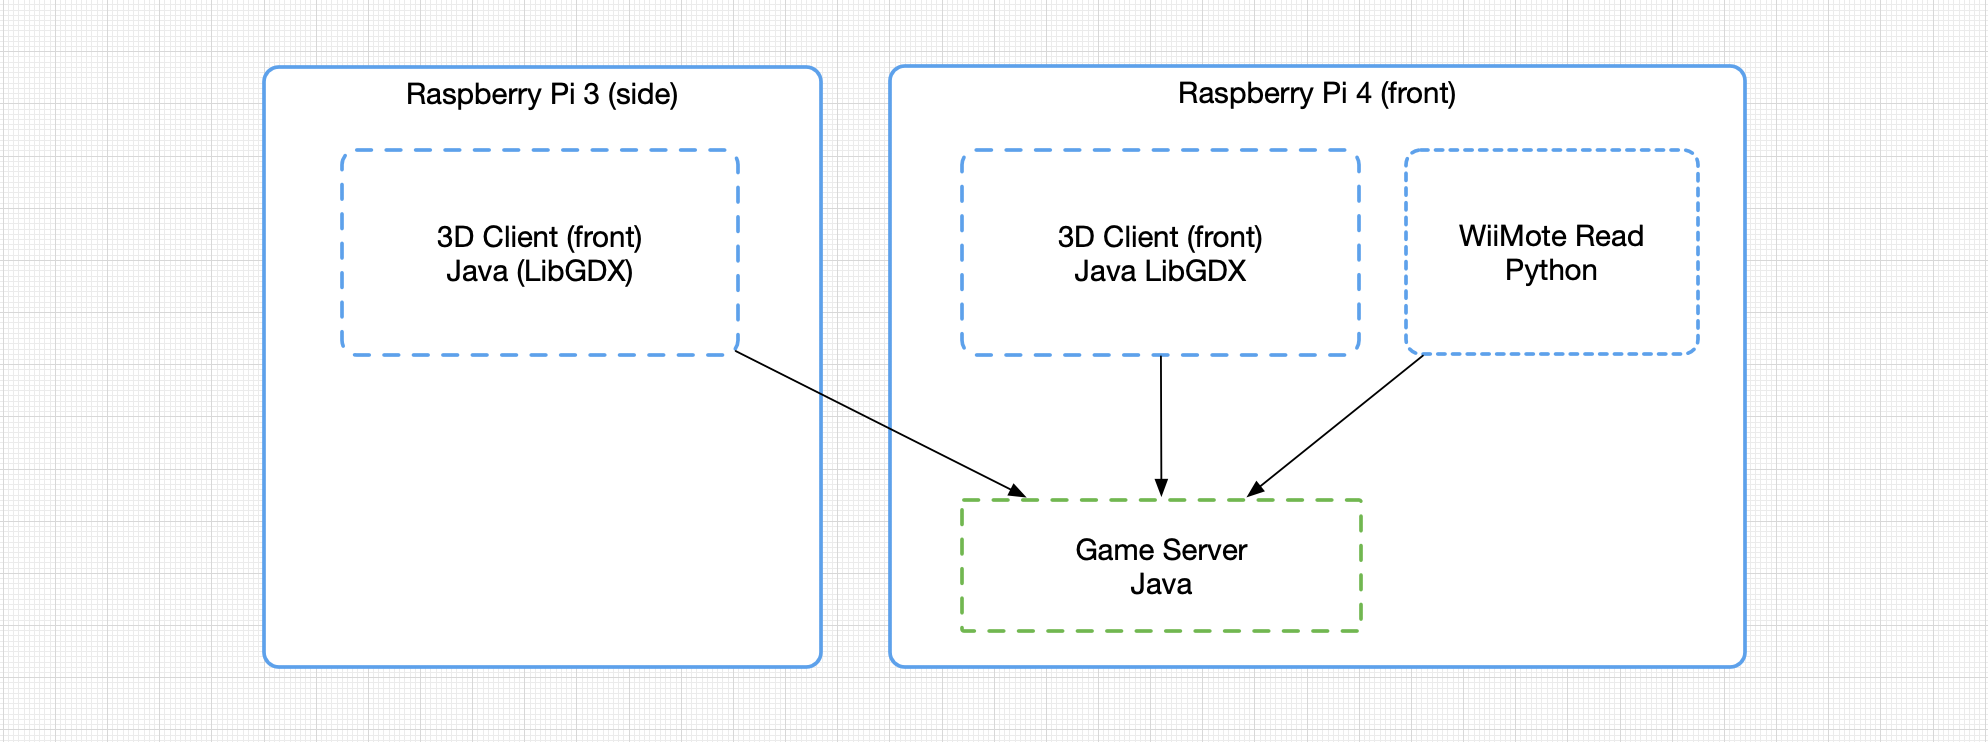
Now, having game server running on the Raspberry Pi 4 and clients on both Raspberry Pi 3 and Raspberry Pi 4 showing cute fish swimming around, we needed to add some ‘depth’ to the whole scene. And, back to Johnny Lee’s idea, I added WiiMote to the list of ‘moving’ parts. Actually WiiMote is to be static and set on some distance from the tower, looking into the camera that will shoot the challenge and report camera’s position back to the game server.
In order for WiiMote to ‘see’ camera - we needed IR LED attached to the camera (read: bread board, wires sticking out, elastic bands, blue tac and such - until Pal made really cute little PCB with button battery).

Yes, all seems easy on the paper, but… As always there were some challenges along the way:
- Java has lost ability to use Bluetooth some 10 years ago or so
- I had very little time and wish to start writing low level Bluetooth access using sockets and low level C file access (with special features) - in Java
- Python already had library and very simple example to read position of IR LEDs from WiiMote
So, in order for Python process to send position of the camera back to the game server, I needed to re-implement client side of my multiplayer game in Python. Some time ago, for the Simulator I implemented server side stuff in Python so client can be driven from simulation defined and run in Python. This was exactly the opposite needed here. Back to coding and I created Python client (with all message types, protocol and such) so Python program that reads WiiMote camera can ‘log in’ to the game sever as yet another client, tell server it doesn’t want to receive updates, but still send ‘player input’ back to the server. ‘Player input’ in this case being tailored X, Y and Z coordinates of the camera as seen from the WiiMote.
Software (IV) - Near, Far, FOV and other stories
And if this seems complex, next part did push me and my mathematical knowledge to the limit.
In order to display correct picture on the monitor screens I needed to change the way classic 3D graphics renders objects on screen. In classic 3D game perspective is in the middle of the screen. For this implementation, as camera moves perspective point have to go the opposite direction. Here are some images I sketched trying to understand the problem:
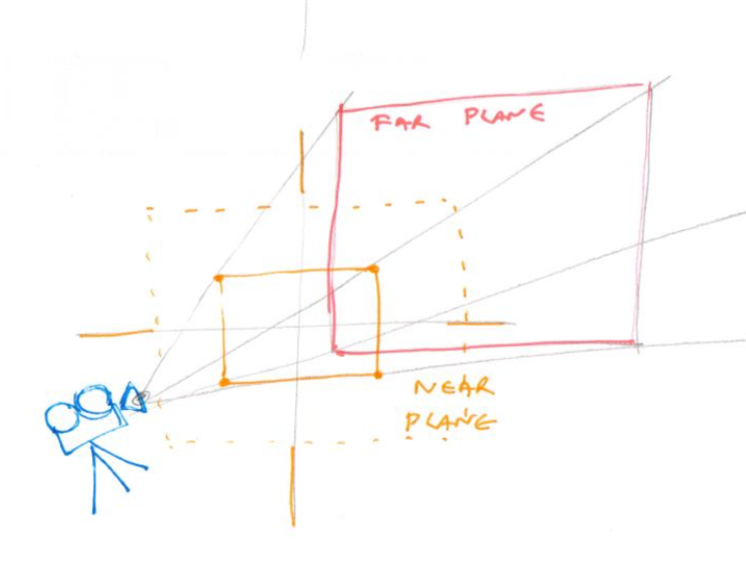
Here we see near plane and far plane. All the objects in the ‘cone’ between these two planes are normally rendered on the screen. Dotted orange far plane is ‘classic’ perspective in the centre, while red one is when camera moves to the side. In this example camera went to the left and far plane to the right. (That way we can see ‘behind the screen’)
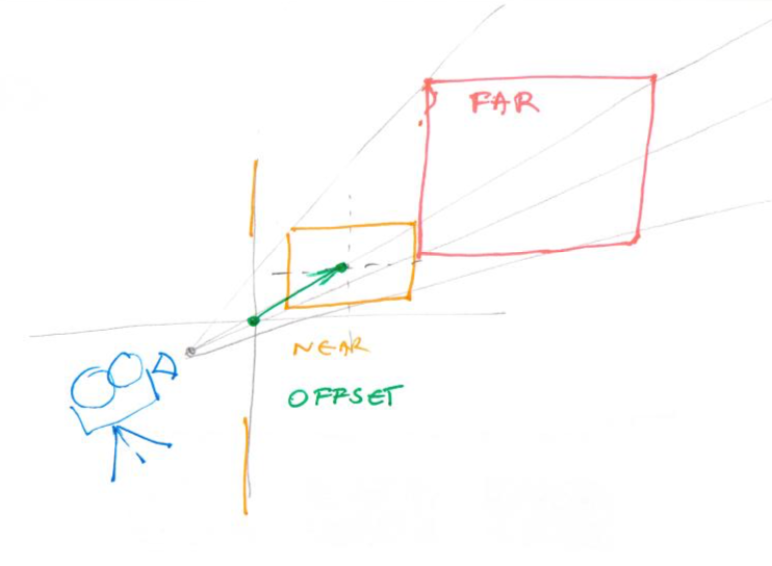
Here we have idea that our screens are not in the middle of the ‘world’ but one is shifted to the right while other would be 90º to the first - around the corner from the first one.
To achieve all of this I needed to find right combination of elements in 4x4 projection matrix and combine it with the camera matrix and… Wow… Looking back to all of this I almost do not believe I’ve been doing all of this. Give it another year and I’ll start doubting it was me who did it in the first place!
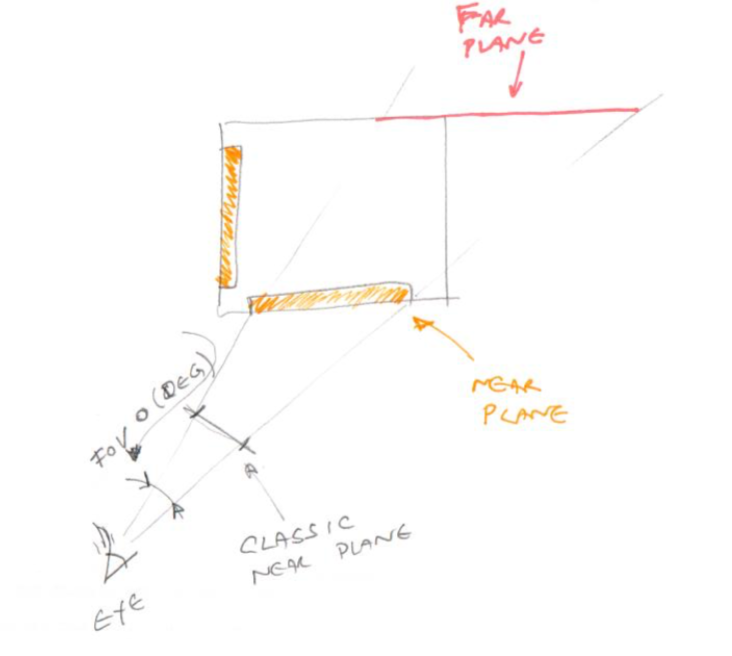
And finally my head nearly exploded when needed to calculate FOV - a field of vision angle (yet another bit in above 4x4 matrix), so I had to sketch all so I can do a bit of trigonometry to calculate correct angle. A few introduced bugs later, couple of nights I couldn’t sleep, couple of bugs discovered and fixed, code simplified and … it started looking like a real thing!
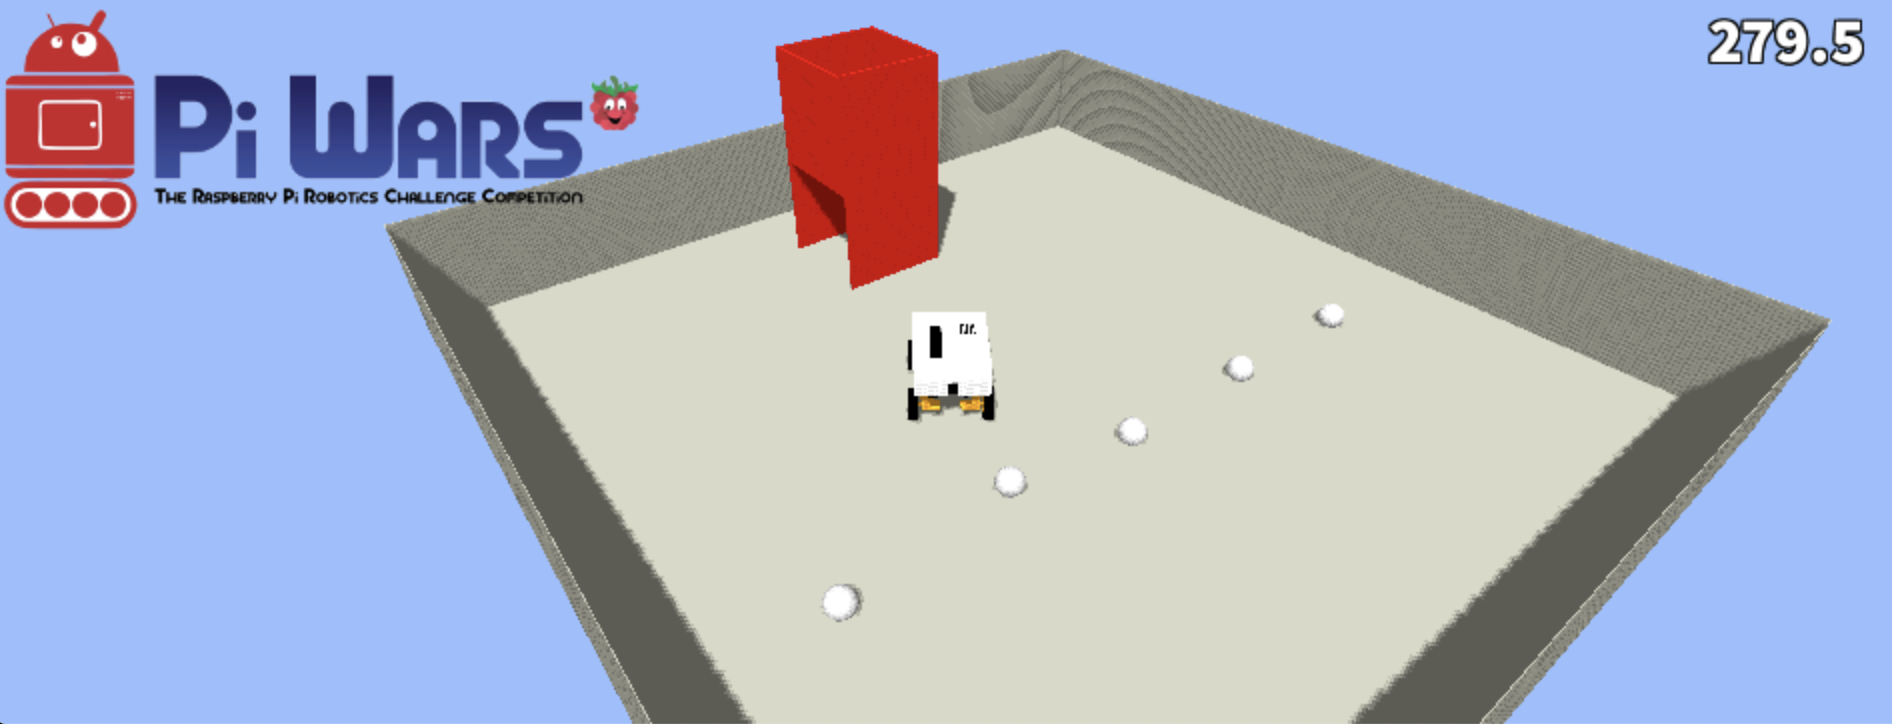
Food Pellets
And last component to all of it was to find out and feed back to the game server if our food pellet got into the water of the
tank. Fortunately that was the easiest of all - we’ve already had lots of experience (some really nice - some
not so) with distance sensors. Two of them mounted inside of the tower - looking up to but not over the brim of the tower
were enough to detect ball being thrown in! But, nothing is as straightforward and simple. One of the decisions at the beginning
was to use beta 64bit version of the Raspberry Pi OS. No issues with it except Richard Gemmel’s VL53L1X library
was originally compiled for 32bit version of OS. Luckily kindly Richard provided us with source and one make command later
(a good few days later) produced 64bit version and the same Python program that was reading WiiMote got promoted to
setting up of two VL53L1X sensors on the same i2c bus (see here)
and reading them 15 times a second and sending special boolean value each time distance of any of these two sensors
changes for more than 10% over last 15 readings.
Software (V) - Wiring All Together
As with every good convoluted solution, this one was spread across two computers (two Raspberry Pis) and four or five software components. Just imagine what was the procedure just for starting all:
- make sure side panel is on (screen blanking hasn’t been switched off as it was really needed as tower was powered 24/7 for a few weeks)
- make sure front panel is on
- ssh to front Raspberry Pi (Raspberry Pi 4) and start game server (actually it was starting both game server and front client with one Java jar)
- ssh to side Raspberry Pi (Raspberry Pi 3) and start client (same jar deployed there, too)
- start Python code on front Raspberry Pi
- test all
It was fine while developing but when it was supposed to be moved to the final destination and married with the arena for Feed the First challenge - spending 5-10min starting up everything (and/or scratching head what has gone amiss when it didn’t work) wasn’t the most convenient way to do so.
So, that was another piece of work needed for all to ‘hang’ together. First, I’ve created a little Python utility (Python Executable) that allows Python programs to be packed for Unix-alike machines (Linux and Macs these days) to one ‘executable’ which will work as long as Python (Python 3) is installed there. It’s purpose is simple:
- create zip file with all Python dependencies from requirements.txt
- prepend zip file with a shell script (Yes! You can prepend to Zip file and it will still stay valid) which will setup Python to use that Zip file as one entry in PYTHONPATH
- and then same script will start your main Python program from that archive
That script/zip file can be made executable the same way as any shell script would be and started exactly the same way, too. Even
from Java. So, I modified maven pom.xml file to run such Python ‘packager’ program and add that script/zip file to the
jar file. Then made Java class which extracts that file at the runtime to temp dir and starts it after the game server has
started.
But, that wasn’t enough. One Java executable jar was enough to start game server, Python WiiMote and distance sensors program,
and client 3D renderer, but what about the other Raspberry Pi? Fortunately that was easy done by another shell script which was
in charge to run this Java executable jar. Same script used ability of SSH to execute commands remotely and was, at the beginning
rsync-ing the same jar file to the side Raspberry Pi, executing little program which ‘woke’ X screen and started same jar remotely and then
locally. Just try to imagine what was stdout like on the shell of the front Raspberry Pi where three separate programs sent
their output!
Side note: luckily client 3D renderer was the least chatty (especially after started!) as LibGDX allows code to run on Windows, Linux and Mac, Android and iOS and last but not least on HTML5 - Java translated to JavaScript using Google’s GWT. Because of the latter System.out is not something that can (or should!) be used - log statements were really sparse (or just not added) to 3D client renderer part of the program…
Conclusion
I must say that I am happy with the final result - even though:
- fish might have been animated slightly better
- fish eventually ‘escaped’ the tank (another bug, eh)
- detection of food pellets dropping in might have been slightly more consistent
- more ‘fine tuning’ could have been done for the ‘perspective’
But, amount of effort put into just this decoration of one challenge rivals effort of some teams put in the competing rover itself. Software wise only this is quite complex and arching over several different disciplines. But, it was really fun doing it. Effect of depth and 3D-ness of the screen is uncanny. Fish do swim around Benchy and treasure chest. You can see ‘behind’ some of the objects in the tank. Pellets of food do drop to the floor of the fish tank. Almost as if there are ‘Cheap Chinese Holographic Displays’!