
Software Architecture for Small Robots – Part 1
Introduction
There is a lot happening in a robot’s “brain”: processing inputs coming in from various sensors at different rates, low-level outputs to control motors or other actuators, possibly combined with feedback loops. And there is the logic that actually decides what to do, keeping track of everything, maybe making simple plans and executing them. Sometimes it’s just a direct reaction to inputs (e.g. left motor power = some function of distance values), sometimes it’s much higher level, e.g. “now that we’ve visited the red corner, go back, start turning and look for something blue”. Even if you don’t worry too much about “architecture”, the question will come up eventually: how do you put all this together in software?
Is it a single main loop, where everything is done step by step, all synchronised (“sense → plan → act”? Does this mean we need to stop, think, carefully evaluate all we know about the world and make a plan and then execute that plan blindly? Or rather, is this a tight loop entirely driven by sensors, with only immediate reactions, without any longer term planning, so “read sensors → quickly decide how to change output right now → send output to actuators”?
Or is it a set of processes, all running in parallel at their own pace? One (or more) dealing with inputs as they come in, another for “driving”, running the current “plan”, waiting for things to happen, reacting to changes, and maybe another, responsible for outputs and feedback loops? How will these processes communicate with each other? How do we test them and make sense of what’s happening?
How should we deal with different scenarios (various Pi Wars challenges)? Do we simply write separate programs for each and just copy the common bits? Do we write one main program with a big “switch” in it, that reacts to some special remote control input?
How do we break down high level goals into simpler tasks that we could more easily implement and reuse? (For example a task to “follow a given heading” or “start turning and wait until we turned 90 degrees to the left”.)
Will our code only “live” in the actual robot? Wouldn’t it be nice to be able to run and debug the same thing in a simulated environment too? How about logging and telemetry? How and what do we want to expose from what’s happening inside, so that we can debug it?
Are our robots even complex enough to worry about “architecture”? Can’t we just make it up as we go along? Do we just write one-off code for a competition or should we try to build something more long-term and extensible that we can build on later? Is it worth considering a more serious robotics framework, like ROS? Or invent our own?
OK, we should stop here, we are not going to answer all these questions!
Let’s try and narrow down our goals and start with something more concrete and small. Let’s call this Software Architecture for Small Robots. We want something that:
- makes it easier to deal with things happening at different rates, or different layers, e.g. low level inputs/outputs and high level logic,
- allows us to express our high level logic in a clean way, not mixed up with low-level concerns,
- makes it possible to compose things, by breaking down complex behaviours into smaller steps,
- keeps things synchronised in a way to make it easy to reason about the current state of our robot, the actions it’s performing at a given time, to help with logging and debugging,
- is easy to understand, not as complicated as a full “robotics framework”: simple things should be simple to implement,
- doesn’t need a lot of resources to run.
In terms of resources and software environment, our initial targets (for “small robots”) are:
- Pi Zero: most things really shouldn’t need more than this. We obviously don’t want to limit ourselves to this particular kind of device, but the point is that we want our software to be lean enough to work fine on a Pi Zero.
- One single process: again, this is not a limitation, but we don’t want something that requires multiple processes.
- Python: because this is what’s most accessible in terms of ease of use, popularity, and library/HW support for the Pi. The dynamic nature of the language is also a benefit for quick experimenting.
The main loop
Let’s start with something simple: a single main loop.
1
2
3
4
while True:
    input = get_sensor_data()
    output = do_the_clever_bit(input)
    do_actions(output)
get_sensor_data(): let’s assume we already have this function that can always return the latest information we have from all our sensors, without having to wait for anything. Let’s not worry too much about how it works for now.
do_the_clever_bit(): like the name says… we don’t know what comes here yet, but it’s something that will work out what to do based on sensor inputs.
do_actions(): this is where we tell the actuators what to do.
A simple example, where we have some distance sensors and want to drive two motors for the left and right wheels to steer between obstacles, would look like this:
1
2
3
4
while True:
    distances = get_sensor_data()
    left_motor_power, right_motor_power = calculate_motor_power(distances)
    drive_motors(left_motor_power, right_motor_power)
Line 2: Get the current distance measurements around the robot.
Line 3: From the distances, we calculate how much power we need to apply to the left-right motors so that we can turn to avoid any close obstacles.
Line 4: Adjust power to both motors.
So far so good: at every given moment, we decide how to react to the current inputs. Our “clever bit” is really just a plain function that does a simple calculation. (Another example could be a main loop for remote control: it would look exactly the same, but our inputs would come from the controller, rather than sensors.)
Wall following behaviour (the Pledge Algorithm)
Let’s think about the “clever bit” now: as an example, let’s try to implement wall following. Here is the description of the Pledge Algorithm from the Elements of Robotics book.
1
2
3
4
5
6
7
8
9
10
11
12
13
14
15
heading ← 0°
repeat
    if wall-ahead
        turn left
        heading ← heading + 90°
    else if corner-right
        if heading = 0°
            move forward
        else
           turn right
           heading ← heading − 90°
   else if wall-right
       move forward
   else
       move forward
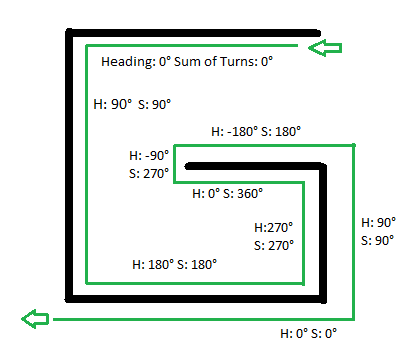
We are not going to describe the details of how or why it works (read the book!), the point is that this is how a nice, high level description of an algorithm looks like. If you do some research about various algorithms related to robotics, this is the kind of thing you’ll find. Let’s call it a behaviour.
Main loop vs. behaviour
If we analyse our algorithm above, we’ll see that:
- it relies on inputs from distance sensors (
wall-ahead,corner-right,wall-right), - it produces output to actions that drive the robot (
move forward,turn left,turn right).
So it’s really like the “clever bit” we wanted earlier in the middle!
Let’s see how we could translate this into Python, and then put it next to our previous main loop:
Main loop
1
2
3
4
while True:
    input = get_sensor_data()
    output = do_the_clever_bit(input)
    do_actions(output)
“Clever bit” (wall following)
1
2
3
4
5
6
7
8
9
10
11
12
13
14
15
heading = 0
while True:
    if wall_ahead():
        turn_left()
        heading = heading + 90
    elif corner_right():
        if heading == 0:
            move_forward()
        else:
            turn_right()
            heading = heading - 90
    elif wall_right():
        move_forward()
    else:
        move_forward()
But we have a problem! We can’t simply turn our new piece of code into a do_the_clever_bit() function that would fit into the main loop. It does what we want from it, but it’s trying to do everything, in its own “main” loop!
The problem is that reading inputs and producing outputs is now happening inside the behaviour (the “clever bit”), mixed with logic. It doesn’t look like that neat sequence any more!
No need for main loop?
It appears that we can’t have both. It’s a shame, because our initial single main loop concept feels right, it’s so simple and predictable. But the way the whole wall following behaviour is represented in its own loop also looks correct.
Maybe at this point we just have to forget about the main loop, and accept that our logic is now too complex to fit into that original (simplistic?) concept.
wall_ahead(), corner_right() and wall_right() are kind of like get_sensor_data() in our main loop. Likewise, move_forward() and turn_right() are like do_actions(output).
So it doesn’t look too bad. Maybe wall_ahead() etc. can be implemented as functions that simply call get_sensor_data() internally and return some specific result based on the sensor data they get. We can do something similar for driving, as move_forward() and the other actions seem to be just special versions of do_actions(). So maybe something like this:
1
2
3
4
5
6
7
8
9
10
11
12
13
14
15

def wall_ahead():
    data = get_sensor_data()
    # check if we see something very close in front of us
    return data.front_distance < 10 # or something like this…

def wall_right():
    data = get_sensor_data()
    # check if we see something very close to the right
    return data.right_distance < 10

def move_forward():
    # apply equal power to both motors
    do_actions({ 'left_motor_power': 100,
                 'right_motor_power': 100 })
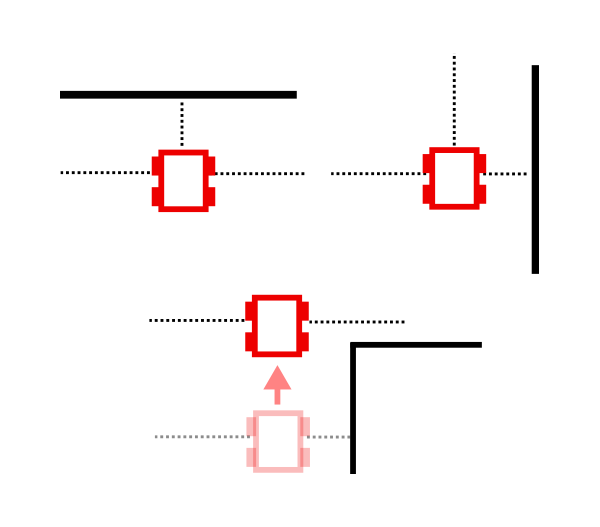
This looks like a good start. But how about corner_right()? One simple way of determining whether we have a corner to the right is to look at the history of our right distance readings: if we saw a wall there before, but now it’s gone, it has to be a corner! So corner_right() needs to store or remember some kind of state, it can’t be a plain function.
One way to solve this would be to introduce a new wall_right_before variable in our main behaviour loop, to remember the previous value of wall_right(). So instead of having a corner_right() function at all, we replace the condition in line 6 with wall_right_before and not wall_right(). (And we also have to update this new wall_right_before variable every time we call wall_right(), so after line 6 and line 12.) This is easy enough. But it means we are making changes to our main algorithm (behaviour): we are adding more details to it that are specific to how our sensors work, instead of hiding these details behind functions like they were initially.
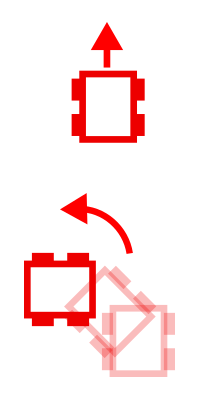
We have another problem with turn_left() and turn_right(): if these simply set different power values to the left/right motors, the robot would start to turn – and then keep turning. That deceptively simple turn right line in our original pseudo-code really means “turn right 90 degrees”. The implementation of this is actually something like “apply correct power to left/right motors to start turning, wait until we reached 90 degrees from where we started (maybe determined by using a compass), then stop”. So something like this:
1
2
3
4
5
6
7
8
9
10
11
12
13
14

def turn_left():
    data = get_sensor_data()
    # set_heading is where we want to face at the end
    set_heading = (data.heading - 90) % 360
    # start turning
    do_actions({ 'left_motor_power': 0,
                 'right_motor_power': 100 })
    # keep checking the compass as we turn
    while (data.heading != set_heading):
        data = get_sensor_data()
    # stop
    do_actions({ 'left_motor_power': 0,
                 'right_motor_power': 0 })
But this means that turn_left() and turn_right() are not single actions any more: they are a mixture of reading sensors, some logic, and sending outputs.
So it really looks like we have no other choice than to build things from “top to bottom”: start with the high-level behaviour, implement all the necessary details, with lots of calls to get_sensor_data() and do_actions() everywhere: we can’t do these only in one predetermined place.
Is this all? Problem solved? We’ll see in Part 2…