ROS 2 on a Raspberry Pi Zero 2 W
28 November 2021
This is my first attempt to set up ROS (Robot Operating System) on a Raspberry Pi Zero 2 W, using the 64-bit version of the Raspberry Pi OS.
I’ve been reading about ROS before, but haven’t actually used it. The start of the new 2022 Pi Wars competition followed by the release of the Pi Zero 2 seemed like a good opportunity to try it.
Everything is pretty much bleeding edge: I’m using the latest ROS 2 release, Galactic, and the latest beta image for the 64-bit Raspberry Pi OS.
ROS doesn’t support Raspberry Pi OS directly and it definitely needs a 64-bit system. (The closest supported OSes are Ubuntu Focal (20.04) and Debian Bullseye (11), which are “close enough”.)
The Pi is meant to be used in a robot (so it will be a headless install) and for all the visualisation tools I’ll use an Ubuntu 20.04 desktop. As a complete beginner with ROS, I first wanted to find out that: 1. Can it work at all with this setup? 2. Can it use a camera on the Pi?
The following is a step-by-step description of the whole setup process.
Prepare the image for the SD card
-
Download the image: https://downloads.raspberrypi.org/raspios_lite_arm64/images/raspios_lite_arm64-2021-05-28/2021-05-07-raspios-buster-arm64-lite.zip
(This was the latest version when I started – an update has been released a few days after, which I haven’t tried yet.)
-
Write the image to the SD card (using the correct device for
/dev/sdx)dd bs=4M if=2021-05-07-raspios-buster-arm64-lite.img of=/dev/sdx conv=fsync(This will create two partitions,
rootandboot– the latter is referred to as/boot/below.) -
Set up remote access
Add
/boot/wpa_supplicant.conf:ctrl_interface=DIR=/var/run/wpa_supplicant GROUP=netdev update_config=1 country=GB network={ ssid="<Home Wi-Fi SSID>" psk="<Home Wi-Fi passphrase>" key_mgmt=WPA-PSK }Add an empty
/boot/sshfile. -
Add overlay for a safe shutdown button
Add one line to
/boot/config.txt:dtoverlay=gpio-shutdown,gpio_pin=3This isn’t critical but can be useful for headless setups: connecting GPIO3 to GND momentarily will shut down the OS and doing it again will wake up the Pi again. (As these pins are opposite each other, it’s a convenient default but will need to be changed later to avoid conflict with I2C.)
-
Make the image work with the Pi Zero 2 (based on various forums and blogs, for example from Jeff Geerling’s first review)
mv /boot/bcm2710-rpi-3-b.dtb /boot/bcm2710-rpi-zero-2.dtb
Configure the Pi after the first boot
-
Basic setup and updates
- Set new password for
pi - Set up ssh keys for remote access (
/home/pi/.ssh/authorized_keys) - Update
/etc/hostname apt-get update && apt-get dist-upgrade- After a reboot,
rpi-update(because we want bleeding edge…), then reboot again
- Set new password for
-
Camera
Being able to use the camera is critical for any plans for building a robot later! It wasn’t immediately clear if everything would work: right now (at the time of writing) happens to be an odd transitional period with the move to a 64-bit OS and a new camera stack on the Pi, and with the uncertainty of what and how ROS can actually work with on this system.
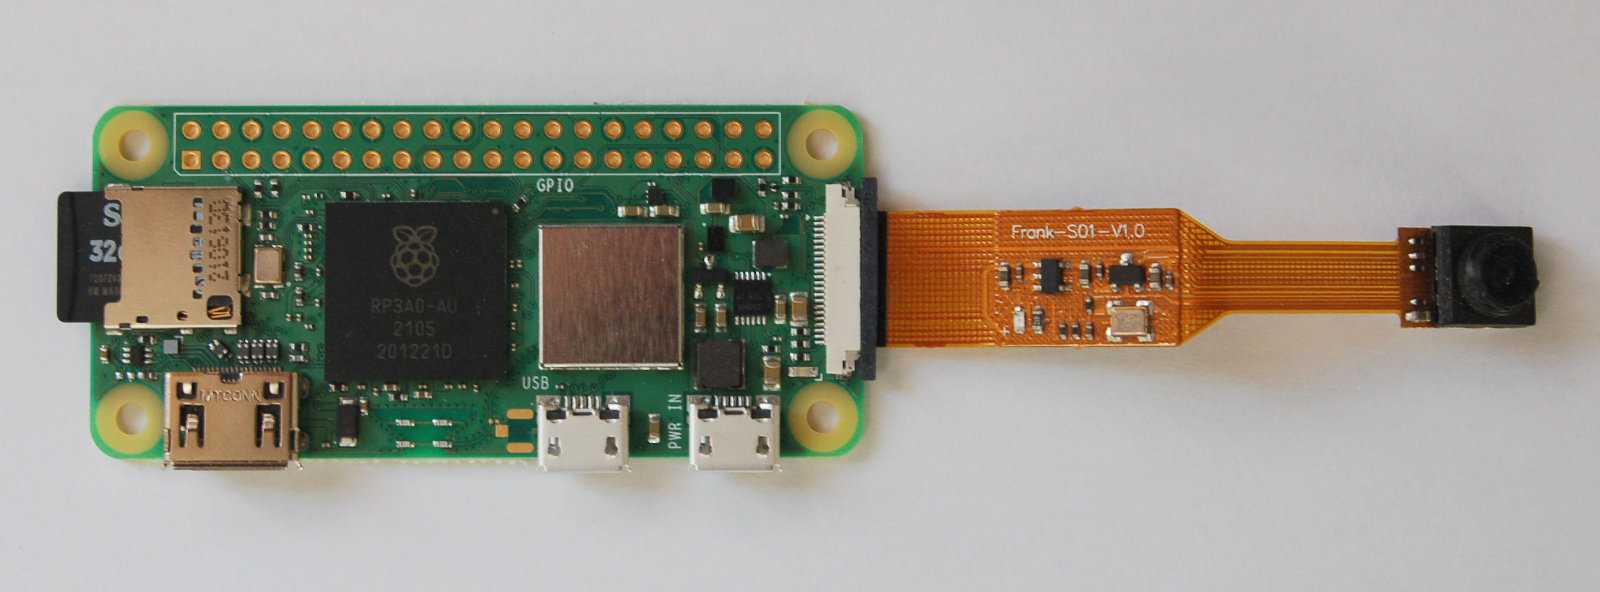
For this test, I used a wide angle camera with the Pi Zero connector.
- Enable the camera with
raspi-config - After a reboot,
/dev/video0should exist andvcgencmd get_camerashould showsupported=1 detected=1. - A few useful
v4l2-ctlcommands to check if it’s working:v4l2-ctl --list-devices v4l2-ctl --list-formats-ext v4l2-ctl --set-fmt-video=width=1920,height=1080,pixelformat=MJPG \ --stream-mmap --stream-to=output.jpg --stream-count=1
- Enable the camera with
Install ROS 2 on the Pi
It looks like there are three installation methods, in increasing levels of complexity: 1. from distro packages, 2. from pre-built binaries, 3. building it locally from source.
The first two methods didn’t seem to work (which is not surprising), so we’ll follow the third one. The next steps are mostly copied from there:
Add the ROS 2 apt repository
curl -sSL https://raw.githubusercontent.com/ros/rosdistro/master/ros.key \
-o /usr/share/keyrings/ros-archive-keyring.gpg

echo "deb [arch=$(dpkg --print-architecture) signed-by=/usr/share/keyrings/ros-archive-keyring.gpg] \
http://packages.ros.org/ros2/ubuntu $(lsb_release -cs) main" \
| sudo tee /etc/apt/sources.list.d/ros2.list > /dev/null
Install development tools and ROS tools
sudo apt update && sudo apt install -y \
  build-essential \
  cmake \
  git \
  python3-colcon-common-extensions \
  python3-flake8 \
  python3-pip \
  python3-pytest-cov \
  python3-rosdep \
  python3-setuptools \
  python3-vcstool \
  wget

# install some pip packages needed for testing
python3 -m pip install -U \
  flake8-blind-except \
  flake8-builtins \
  flake8-class-newline \
  flake8-comprehensions \
  flake8-deprecated \
  flake8-docstrings \
  flake8-import-order \
  flake8-quotes \
  pytest-repeat \
  pytest-rerunfailures \
  pytest \
  setuptools
Get ROS 2 code
mkdir -p ~/ros2_galactic/src
cd ~/ros2_galactic
wget https://raw.githubusercontent.com/ros2/ros2/galactic/ros2.repos
vcs import src < ros2.repos
(And from now on, we do everything inside ~/ros2_galactic.)
Install dependencies using rosdep
sudo rosdep init
rosdep update
rosdep install --from-paths src --ignore-src -y --skip-keys "fastcdr rti-connext-dds-5.3.1 urdfdom_headers"
Following the advice from https://medium.com/swlh/raspberry-pi-ros-2-camera-eef8f8b94304 we skip some packages (we don’t want to build any GUI!):
touch src/ros2/rviz/AMENT_IGNORE
touch src/ros-visualization/AMENT_IGNORE
touch src/ros2/system_tests/AMENT_IGNORE
Then continue with the next step from the ROS instructions:
Build the code in the workspace
ROS has a pretty advanced build system, and all you need to build everything is a single command:
colcon build --symlink-install
And this is where the fun begins!
The Pi Zero 2 W has perhaps an unusual combination of components: a fairly powerful (especially compared to the original Zero!) 4-core processor with only 512MB of RAM. The ROS build system tries to do the sensible thing and use all available processor cores to run compilation tasks in parallel. Unfortunately this also blows up memory usage, and the build very quickly fails when it runs out of both memory and swap space.
The default swap space on the Pi OS is only 100MB, so increasing that might seem like an obvious solution. It is configured in /etc/dphys-swapfile and can be increased to 2GB like this:
CONF_SWAPSIZE=2048
Then restart the corresponding service:
service dphys-swapfile restart
This can help avoid crashing when you need a bit more room for short spikes. But that’s not the case with this build when it needs more memory pretty much constantly: it will just keep swapping all the time, stalling the build process completely.
The solution that worked finally is to only use one core. The colcon command has an option for it, but that still wasn’t enough, we also need to set an extra environment variable. (At the time of writing, more proper support for this was still being worked on for colcon-cmake.)
export MAKEFLAGS=-j1
colcon build --symlink-install --executor sequential
With the above, the build process can finally be started safely!
It won’t be fast though… It’s a very good idea to run it in screen so that you can leave it overnight – that is, for a few nights: it took more than 64 hours to finish!
A really useful feature is the ability to resume a half-finished build. If it fails due to memory problems or if you kill it, you can resume later by adding --packages-skip-build-finished to the above command line.
Trying it out
Once the build has finished, run this in one terminal:
. ~/ros2_galactic/install/local_setup.bash
ros2 run demo_nodes_cpp talker
And this in another:
. ~/ros2_galactic/install/local_setup.bash
ros2 run demo_nodes_py listener
If it works, you’ll see “Hello World” messages being published and received.
Install ROS on a desktop (Ubuntu 20.04)
This is the easy part.
To do this manually, follow the steps described in the ROS install guide.
I use Ansible to configure all desktop machines. The recipe below can be used to automate this:
- name: add ROS apt key
  apt_key:
    url: https://raw.githubusercontent.com/ros/rosdistro/master/ros.key
    keyring: /usr/share/keyrings/ros-archive-keyring.gpg
    state: present

- name: add ROS apt repo
  apt_repository:
    repo: deb [arch=amd64 signed-by=/usr/share/keyrings/ros-archive-keyring.gpg] http://packages.ros.org/ros2/ubuntu {{ ansible_lsb.codename|lower }} main
    state: present

- name: install ROS desktop
  apt:
    name: ros-galactic-desktop
    state: present
Now when you start the talker demo on the Pi, you should be able to receive those “Hello World” messages on the desktop too (make sure there is no firewall blocking the traffic):
. /opt/ros/galactic/setup.bash
ros2 run demo_nodes_py listener
Testing the camera remotely
To start publishing camera images on the Pi with the cam2image demo:
. ~/ros2_galactic/install/local_setup.bash
ros2 run image_tools cam2image --ros-args -p reliability:=best_effort
From the desktop (always source /opt/ros/galactic/setup.bash first), we can check if the /image topic appears:
ros2 topic list
And to actually show the camera output:
ros2 run image_tools showimage --ros-args -p reliability:=best_effort
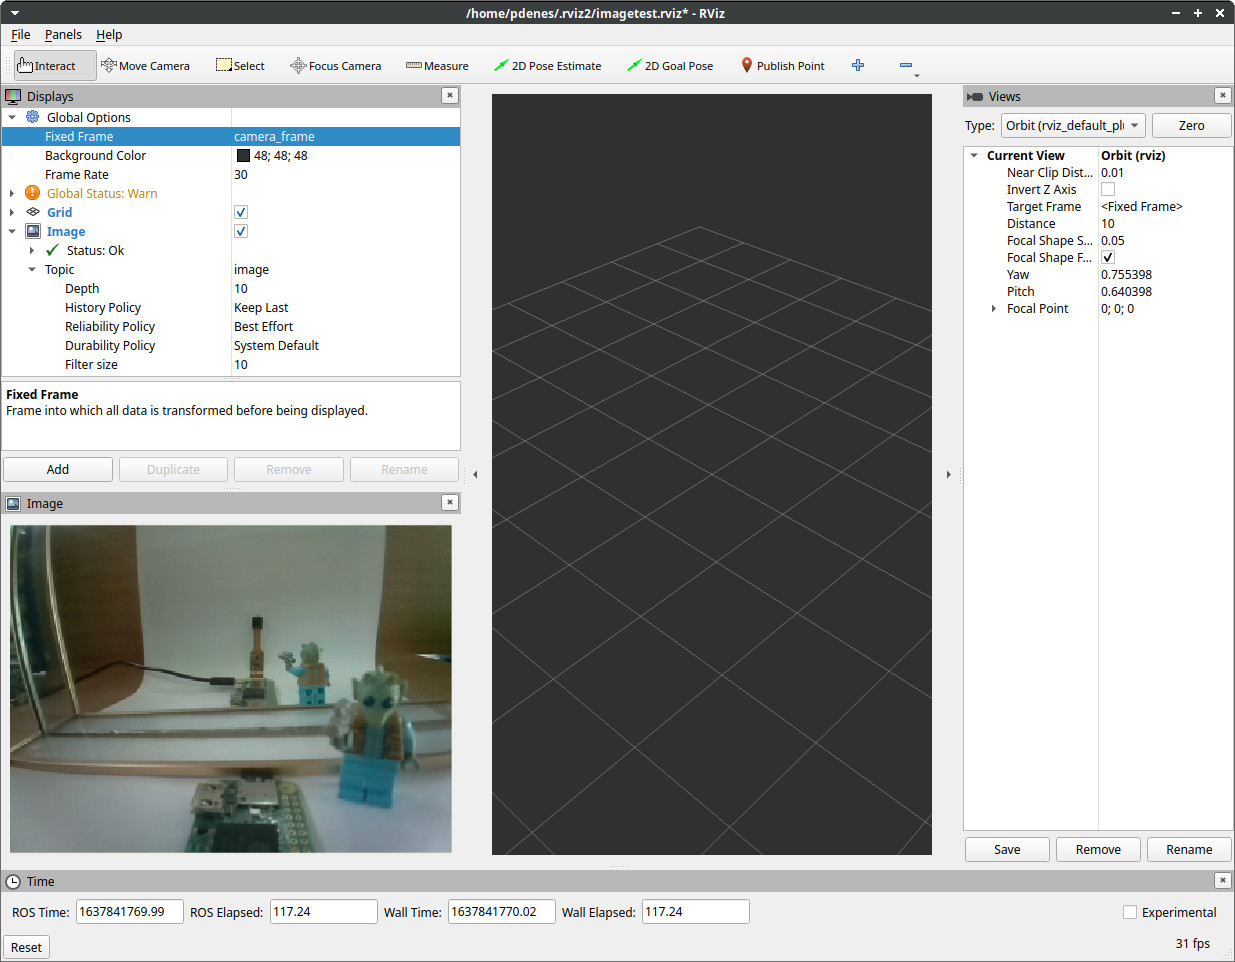
Here is a somewhat confusing selfie using the above (made bigger than the default by adding -p width:=640 -p height:=480 to the cam2image command line):

We can also use RViz to show the camera image:
- Add a new Image display
- Set its topic to
image - Under Global Options, set Fixed Frame to
camera_frame. Without this, RViz won’t show anything! (This bit wasn’t obvious to me at first!)
Now that all this is working, it’s probably time to learn ROS properly and try to do something useful with it!